|
BizWizard Order Manager™ is extremely easy to get started using. After installing, there are a few steps that we must go through to ensure your company is setup correctly with where the BizWizard Order Manager™ database will reside on your hard drive or networked hard drive, creating sales tax tables (See Sales Tax Setup) so BizWizard Order Manager™ will know how to charge sales tax on orders, and lastly, some basic options in System Setup Configuration (See System Setup) to get you going on how you wish to handle certain scenarios that will come up while taking orders. |
Let's delve right in and begin. After you have installed BizWizard Order Manager™, double click the BizWizard Order Manager™ Icon on your desktop.
BizWizard Order Manager™ will auto-configure and setup the first time. It may take a few seconds to complete this auto-configuration. Once it has completed, you will be presented with the following screen with a blue background and two menus in the top menu bar.
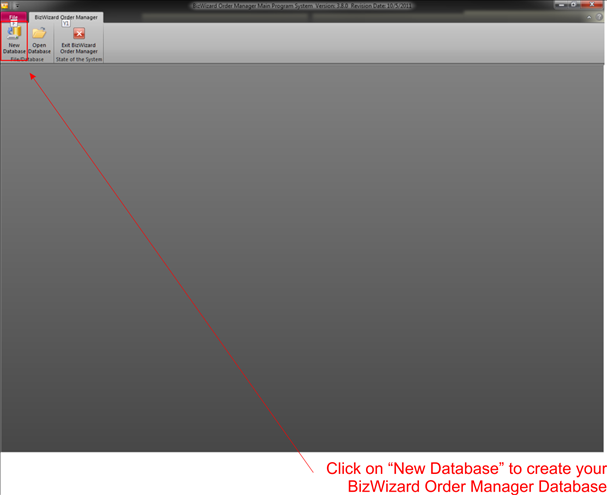
Simply click on the BizWizard Order Manager™ Menu and Select "New Database" to create a New Database (See New Database). See example below:
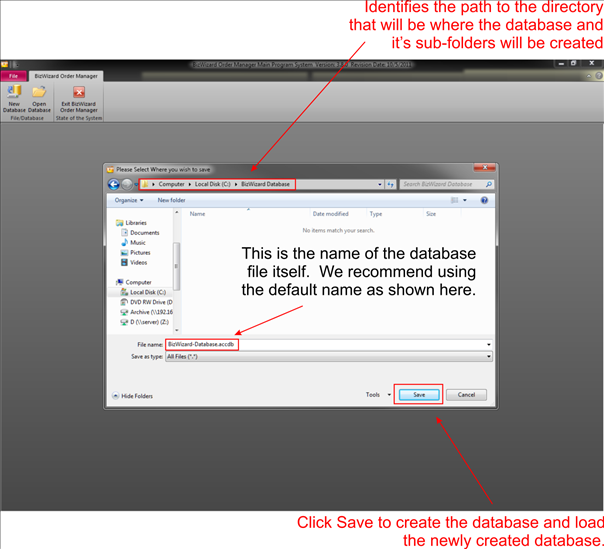
Next we will decide where we want to store our database. It is important to create your database in a folder that is accessible by all computers in your network that will be using BizWizard Order Manager™. This can be on a network share location or on your local computer so long as your computer is a network share location. We recommend you create your database in a folder named "BizWizard Database" and leave the default file name as "BizWizard-Database.accdb" - This will help our technical support representatives assist you better if you have not renamed the database file.
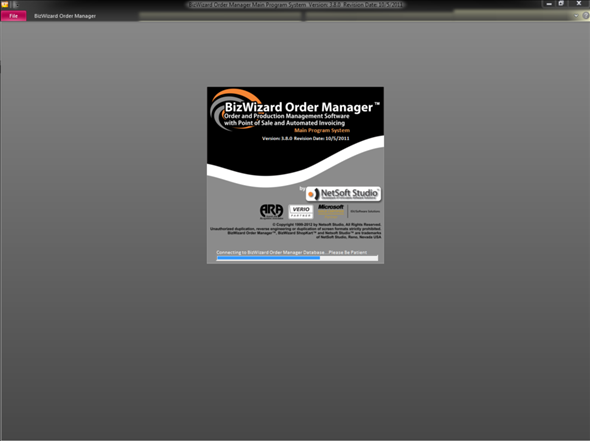
Next you will see the Load Database screen as shown below. BizWizard Order Manager™ is loading and connecting to the various data tables necessary to run BizWizard Order Manager™. Simply wait the few seconds necessary for this process to complete.
After the loading of the database is completed, you will be at the Login screen. The default Associate Name and Password to Login for the first time are as follows (See Work with Associates):
Associate Name: System Default
Password: 1234
After we Login the first time using the above criteria, we will change this user. It is important for the security of your data to change this user because the password for this user is posted in our user’s manual and on our forums and is widely known. After we change the user, and its associated password, then your system is secure from other employees at your company from accessing portions of BizWizard Order Manager™ that they shouldn't be accessing.
NOTE:
If BizWizard Order Manager™ detects that the associate name “System Default” is selected, it
will auto-populate the password for you to the password
of 1234. Once you select “System Default” form the pull-down list you will note
the Password field has four asterisks (e.g. ****) Don't be alarmed by this.
This will only occur if the user selected is “System
Default” and is done to assist new users of BizWizard Order Manager™ with
logging in the first time.

Now let’s perform our second task of changing the “System Default” User. But before we do, let’s talk about the System Default User. The System Default user is a super-User. It has full access and authority to make any change in BizWizard Order Manager™. When we modify this User (See Maintain Associate), it is imperative you do not modify the security settings (See Manage Security). There must always be at least one user with full system authority. If you change the user to remove some authorities you may not be able to get back into setup any new users.
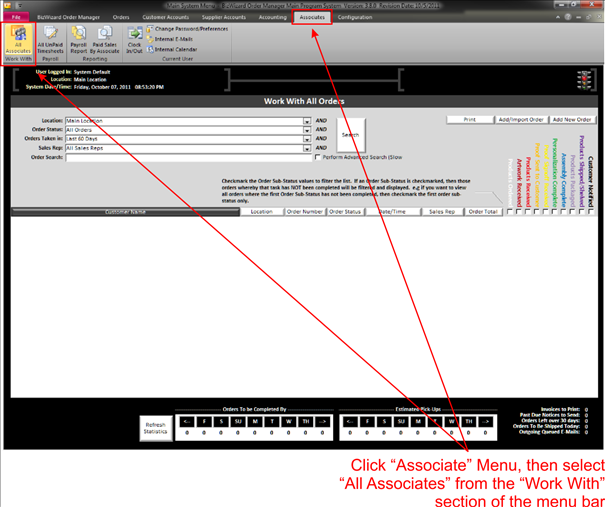
So all we are going to do at this point is change the System Default User to be your name, and then you will pick a password that you will remember. To accomplish this, click on the Associates Menu (See Associates Menu System) in the menu bar and select "All Associates" (See Work with Associates) as shown in the example below:
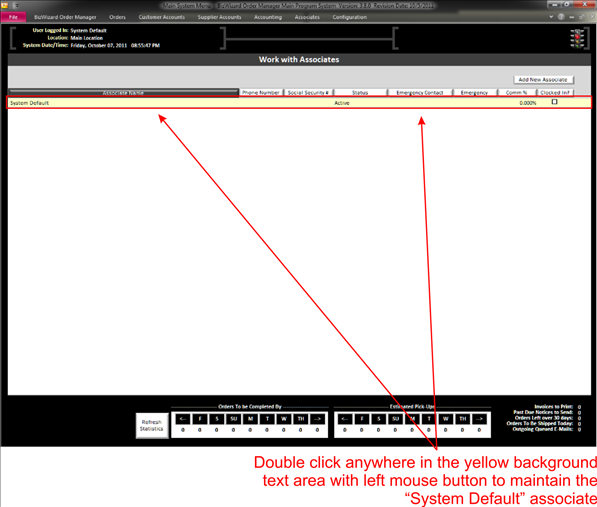
Now we will be able to maintain the associate named "System Default" Double Click the Yellow Background Text area (See Understanding Yellow Background Fields) for System Default User to Maintain the System Default Associate (See Maintain Associate) as shown in the example below:
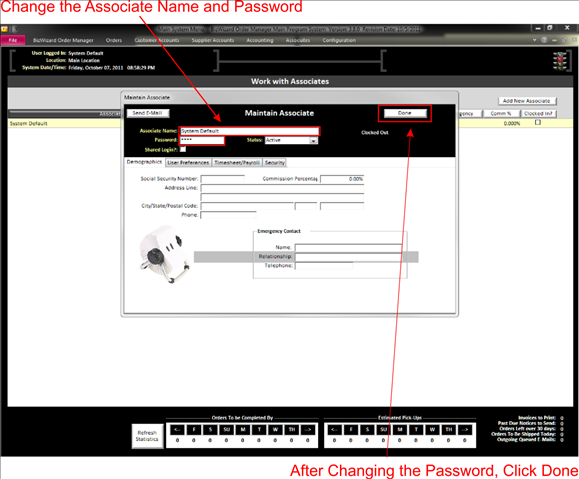
Now we are going to change two values on the Maintain Associate Screen (See Maintain Associate). Change the Associate Name to your name. For our Example, we are changing it from "System Default" to M. David Matney. Next change the password to a password you will remember. Notice, as you type the password what you will see is asterisks, and not what you actually typed. For this reason, create your password carefully. Once you have changed the Associate Name to your name and set the Password, click on done to exit this screen and save your changes.
The next thing we must do is set the Sales Tax tables (See Sales Tax Setup) so BizWizard Order Manager™ will know how to charge Sales Tax and for what rates. Before going into details on how to do this, let’s navigate to the System Setup screen through the Configuration menu. To do this, perform the following steps:
v Click on the "Configuration" menu in the menu bar to expand the menu
v Select "System Setup" from the Configuration Menu
Now, we can manage various aspects the control how BizWizard Order Manager™ functions and operates. From the System Setup Screen, click on the "Sales Tax Setup" tab as shown in the example below:

Now there are a couple of questions you must ask yourself as follows:
- Does
my state require we charge Sales Tax on shipping charges?
- Do I wish to report my Sales Tax based upon when the invoice balance is $0.00 or when the invoice is created?
BizWizard Order Manager™ will need to know if your
state/province requires you to charge Sales Tax on the shipping charge portion of the order,
and it also needs to know whether you would like to report the Sales Tax based
upon when the invoice balance is $0.00 or when the invoices is
billed. Here is the difference between the two Sales Tax reporting methods:
v When
Invoice is Billed
Use this
reporting method to report Sales Tax on your Sales Tax Summarization Report,
even if you have not collected payment in full.
v When
Invoice Balance is Zero
Use this reporting method to only report Sales Tax once the invoice has been paid in full. If an invoice remains with an outstanding balance, then it
will never appear on your Sales Tax Summarization Report
and thus will never be reported which may cause a sales tax compliance
issue. Consult your CPA.
Simply select from the Pull-Down list the Sales Tax reporting method you wish to utilize. Also checkmark the box for Shipping Subject to Sales Tax? Only if your state requires you to charge Sales Tax on the shipping portion of the order.

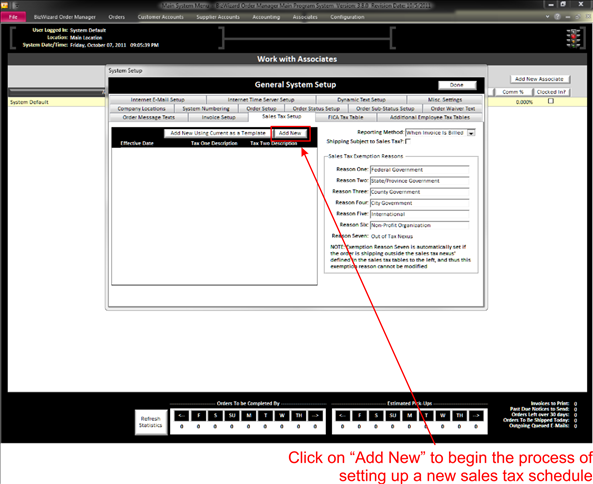
Next, we are going to create a Sales Tax table (See Sales Tax Setup) to let BizWizard Order Manager™ know when to charge for Sales Tax and what percentages. Click on Add New to create a new Sales Tax setup as shown in the example below:
BizWizard Order Manager™ Charges Sales Tax based upon what is called a Sales Tax Nexus. A Sales Tax Nexus is a geographic location for which your company is required by law to collect Sales Tax. For instance, in the state of Nevada businesses are required to charge Sales Tax for all tangible products delivered, shipped or picked up at a physical address to any location within the geographic boundaries of the state.
To determine geographic boundaries, we use postal codes. There are several ways you can create your Sales Tax tables, depending upon the reporting requirements of your state. For instance, in the state of Nevada, businesses are required to collect the Sales Tax rates for each county at the rate of the county based upon products delivered into that county. Even if your company is located in one county, if you ship products to another county, in the state of Nevada, you are required to collect Sales Tax for the county for which the product is delivered or shipped to.
So in the state of Nevada a Sales Tax table setup is a little bit complicated. See the following screen shot and then read further for an explanation:
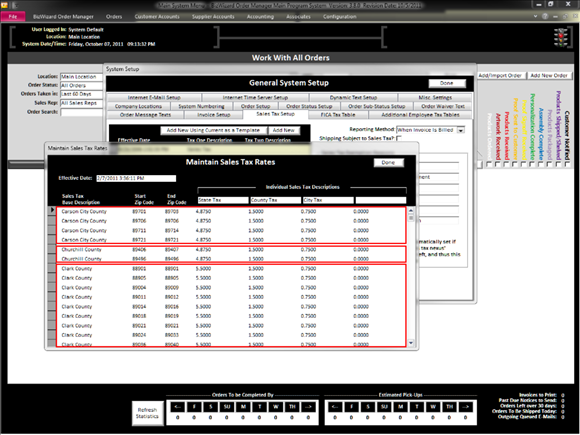
As you can see in the above example, Carson City County has 4 groupings of postal codes, and the Sales Tax rate for Carson City County is 7.125%. We must enter the Starting and Ending postal Code for each zone and the Sales Tax percentage. At the top under Individual Sales Tax Descriptions, you have 4 columns you can create. In our example, we only needed one column named "Sales Tax"
If your states sales tax requirements are more complicated and you must split the Sales Tax into State, County, City rates, and then you can create the first column as "State" and the second Column as County, and third column as City. Each percentage breakdown can then be initialized. For instance, maybe the State Sales Tax is 5.125%, the County Sales Tax is 1.5%, and the City Sales Tax is 1.0%, the following example shows how we would put this in for Carson City County.
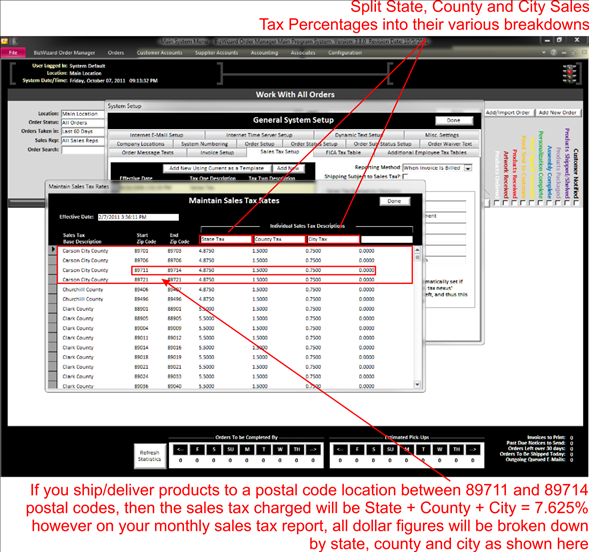
In the above example, the Sales Tax is broken down by state percentage, county percentage and city percentage. On a customer’s order it will only show the total Sales Tax percentage of state + county + city. However on your Sales Tax report (See Sales Tax Summarization Report), the amounts of what was collected for each geographic region will be broken down.
One important item to remember when creating your Sales Tax table is how BizWizard Order Manager™ uses the Sales Tax tables to determine what Sales Tax to charge. If you have postal codes that cross on multiple lines, meaning you have double entered postal codes, BizWizard Order Manager™ will use the first matching Sales Tax record and stop looking any further.
Another important item to remember is that each Sales Tax setup is date/time stamped and based upon the date/time the order was entered into BizWizard Order Manager™, the Sales Tax table that will be used is the one active at the time of first entry. The effective date at the top of the maintain Sales Tax rates window is compared to the date entered (See Order Statistics) on the order to determine which Sales Tax table setup should be used.
This is beneficial as follows. Let’s assume you get a notice from your state Sales Tax board that indicates a 1% increase in Sales Tax effective January 1, 2011. You can easily enter the new Sales Tax rates six month earlier then the rates go into effect, and simply set the effective date to be 1/1/2011 00:00:00 AM. Once that date and time rolls around, BizWizard Order Manager™ will automatically start using the new Sales Tax rates.
So you can get as complicated or as simple with Sales Tax tables as is necessary based upon your states reporting requirements. Either Way, one thing you will need to know are the postal codes that are applicable for your Sales Tax nexus. You should be able to contact your state Sales Tax board to obtain the postal code breakdowns for the various counties and cities if applicable for your state filing requirements should you state need such a break down.
The following are the postal code ranges applicable for state/provinces:
|
|
||||||||||||||||||||||||||||||||||||||||||||||||||||||||||||||||||||||||||||||||||||||||||||||||||||||||||||||||||||||||||||||||||||||||||||||||||||||||||||||||||||||||||||||||||||||||||||||||||||||||||||||||||||||||||||||||||||||||||||||||||||||||||||
Now that you have your Sales Tax Setup configured, you are ready to begin using BizWizard Order Manager™.
