|
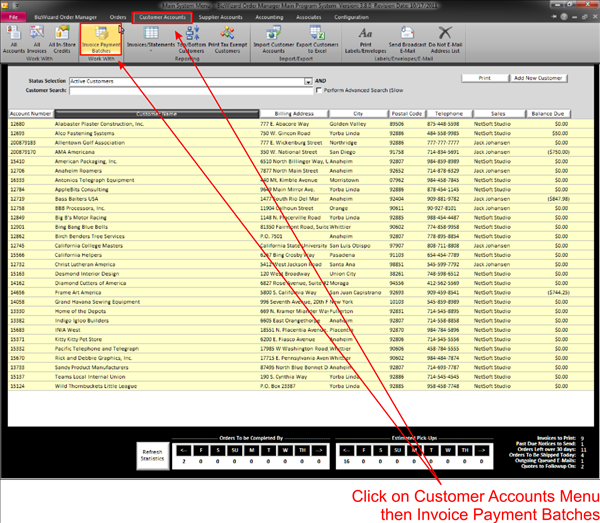
To post a payment to an invoice there are two methods. One is to allow you to post a batch (multiple) of payments to various customer accounts (See Customer Accounts) and the second is posting a payment to an individual invoice. To post a batch of payments click on the Customer Accounts Menu System, then click on the Invoice Payment Batch: |
|

|
|
This will open up the Post Payments to Invoice window:
|
|
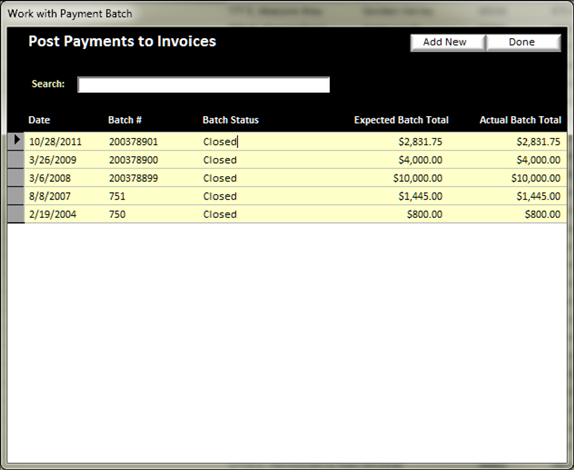
In this window you can begin to add payments to invoices. You will need to either add a new batch of payments by clicking on the “Add New Batch” button in the upper left, or double click on a batch of payments that are still in the “OPEN” status.
When you open a payment batch or start a new batch, the maintain payment batch window will pop open:
|
|
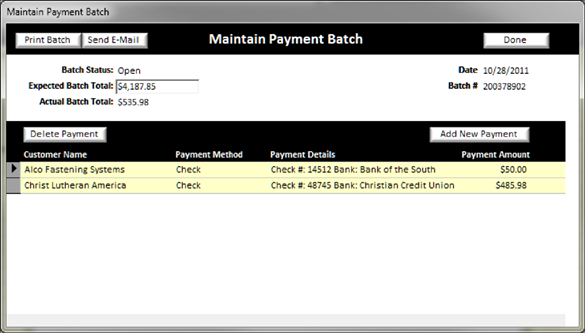
In this screen you will need to enter the Expected Batch Total which is the amount of the total of all payments you plan to post as part of this batch. Before entering checks, use an adding machine to total up those checks and put the total into the expected batch total. Then you can begin to add new payments (apply payments to invoices) by clicking on the Add New Payment button in the middle right area of the maintain payment batch window.
After you are done posting all payments, if the actual batch total which is derived from what you posted, does not match up with the expected batch total, then you know there is an error. This is a checks and balance system. Either the error occurred when you initially totaled up the checks on the adding machine, or the error exists in the posting itself. If the expected batch total and the actual batch total match, then you are good to close the batch. Let’s proceed to posting payments.
When clicking on Add New Payment, the Payment Window will open:
|
|
|
|
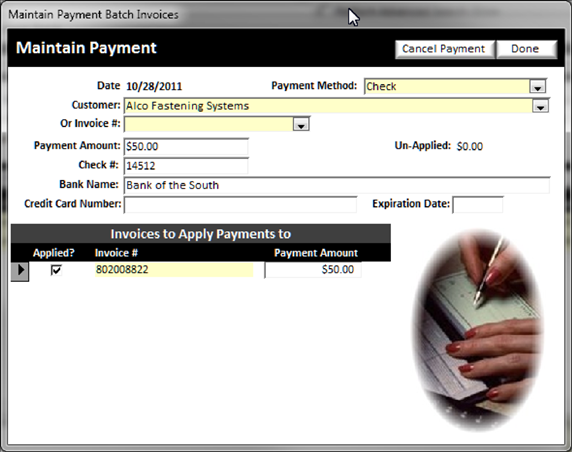
In this window, you will need to fill in several fields to apply a payment to the correct invoice.
The following is an explanation of each field:
v
Payment Method:
Select the type of payment from the drop down menu
NOTE:
if you do not see the payment type in the
drop down, you can double click the Yellow Background Text Field (See Understanding Yellow Background Fields )drop down box to add a new payment method (See Payment Methods)
v Customer: Select the customer (See Customer Accounts) that this payment pertains to.
v
Or Invoice Number:
Sometimes you may have multiple schools or organizations that fall under one
account and it is difficult to find what a check is paying for, if the company
has indicated on the check what invoice the check is paying, you can enter the invoice # instead of the company name to pull up the
correct information
NOTE: When you enter the customer or invoice # fields, all
open invoices Associated with the account will appear in the Invoices to Apply
Payments to Area in the
bottom of the Maintain Payment screen.
v Payment Amount: Enter the amount of the payment
v Check Number: If paying by Check, enter the Check Number
v Bank Name: Enter the bank name the check is from
v Credit Card Number: If paying by credit card, enter the Credit Card Number, (no spaces) and ensure the payment type has been selected with the credit card type of payment, i.e. Visa, MasterCard, AMEX
v
Expiration Date #: If paying by
Credit Card, enter the expiration date of the card. After you have completed
the payment header which, all the customers’ outstanding
invoices will be displayed below. Checkmark the box next to which invoices you
want the check payment applied to.
Since a check payment can be for an amount that pays several
invoices, simply checkmark all the invoices as appropriate. If a check payment does not cover a complete invoice total as shown on the right, you can override
the amount on the right to reflect the actual amount of the payment.
As you are check marking invoices, the un-applied will continue to decrement until $0.00 or a negative number. If a negative number exists, you may have over posted. Check your work. If you have applied the payment to all invoices, then a credit balance condition exists, and upon closing the batch, BizWizard Order Manager™ will create an in-store credit (See Work with All In-Store Credits) for the amount not posted.
As you add payments to the batch, you will see the list of payments Associated with this batch of payments being listed. If you need to edit a payment in the list, just double click on the payment line you want to edit to bring up the maintain payment window again, make your changes and click done.
After all payments have been added to the batch and the Expected and Actual Batch numbers match, when you click done a Close Batch Window will pop up so you can post the batch of payments to invoices.
NOTE: Payments are not applied to the invoices
until the batch is closed. Open Batches
simply hold the payments until they are posted and the batch is closed
|
|
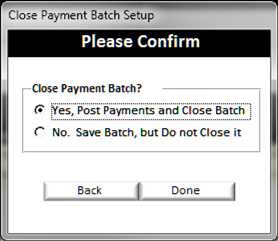
In the Close Payment Batch Setup you have two choices.
v 1st Choice: Yes, Post Payments and Close batch. When choosing this option and clicking done will close this batch of payments and post the payments to all the invoices in the batch.
v 2nd Choice: No. Save Batch, but do not close it. When choosing this option, it will save all the work you have done so far, but will not close the batch, AND it will not post the payments to the invoices yet.
The second method to posting a payment an individual invoice is done from the Maintain Customer Invoice Screen. Open the invoice you want to apply a payment to and click on the Add Payment button
|
|
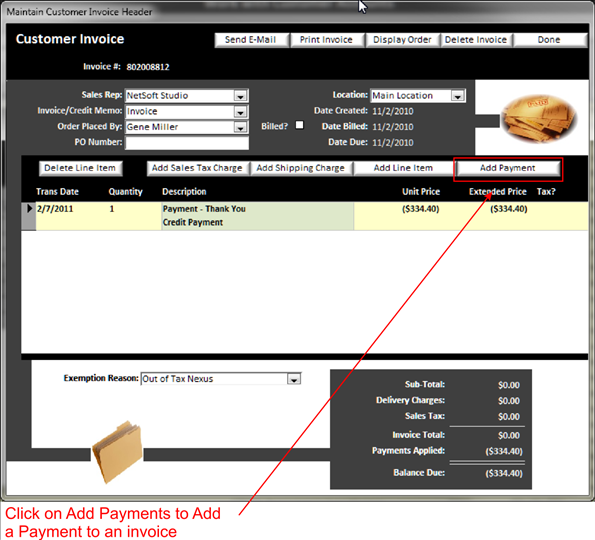
When clicking on the add payment button, the Add Payment to Invoice window will open and allow you to enter the payment details to add a payment to the invoice.
NOTE: Payments added directly to an invoice are
applied immediately and do not appear in a payment batch. The
payment batch is bypassed when posting a payment directly to an invoice.
|
|
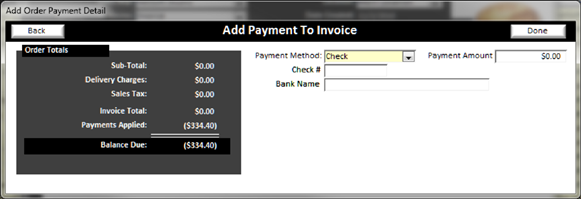
After entering the payment details, click done in the upper right to add the payment to the invoice.