|
To add a new order click on the Add New Order button on most “work with” style screens in the upper right area of “work with” style screens. |
|
|
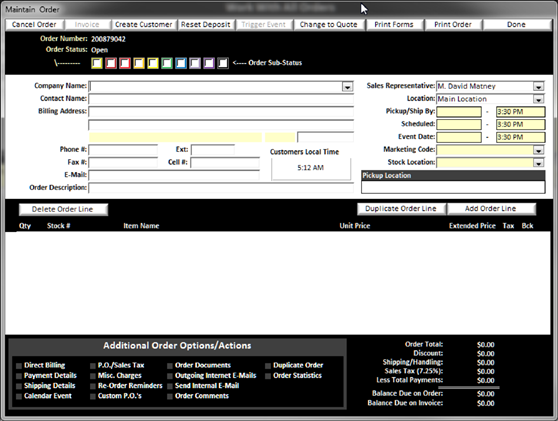
Once you click on the Add new order button the following screen will appear:
|
|
On the blank order screen, start entering the Company or customer name in the Company Name drop down box. If an order has been placed previously by this Customer or Company, all of their information will automatically be populated into the contact information fields. You can edit each of the fields as required.
Enter data into each field as follows for new orders:
v Company Name:
Enter Company Name (not required)
v Contact
Name:
Enter Contact Name (required)
v Billing
Address:
Enter Billing Address (required)
v Postal
Code:
Enter Postal Code (required) once the postal code is entered the
city and state will be populated with the information Associated with that
postal code. All U.S. , Canada and Australian Postal codes are included in the
database. If you are shipping to another area, you can double click on the city
and state blocks (Understanding
Yellow Background Fields)
to override or input information.
v Phone #:
Enter Contact Phone Number (required)
v Extension:
Enter Contact Phone Number extension (not required)
v Fax #:
Enter Contact Fax Number (not required)
v Cell
#:
Enter Contact Cell Number (not required)
v E-Mail Address:
Enter Contact e-mail address (not required). We strongly recommend that you
obtain e-mail address from as many of your customers as possible as this helps
with communication of proofs, order completions and many other facets of BizWizard
Order Manager™. If your customer requests that they do not receive any
marketing mass mailings you can add them to the do not
e-mail list. The do not e-mail list only effects mass e-mailing and does not affect e-mailing your customer copies of their orders, proofs
or other e-mails that are non-mass mail type e-mails.
v Sales
Rep:
Enter Sales Rep from the Drop down list (required)
v Location:
Enter Location from which the order was taken from(required)
v Pick
Up/Ship By:
Double Click on the Yellow
Background Text Field to select the date and time you need to have
the order completed by and ready for pickup or shipping (required)
Note: You can set up the number of days to
pad to automatically set a date for you. To do this you need to go to Order Setup tab of System Setup.
v Schedule:
Double Click on the Yellow Background Text Field
to select the date you wish to begin working on this order. This is useful to
schedule your work
to be completed on time (required).
Note: You can set up the number of days to
pad to automatically set a date for you. You can also choose to not use the
Schedule date option. To change these options, you will need to go to Order Setup tab of System Setup.
v Event:
Enter event date. This is useful information to have to ensure you do not miss
any event deadlines (not required)
v Marketing Codes:
Select your Marketing Codes (See Setting up
Marketing Codes)
from the drop down list. You can have as many Marketing Codes you need.
This is a great way to track where your orders are coming from.
(required)
v Stock
Location:
Enter the pulled Stock Location (not required). You can edit the Stock
Locations (See Setting up Incoming Bins/Outgoing Bins)
available by double clicking on the Yellow Background Text Field
to bring up the Stock Location window.
v Order
Description:
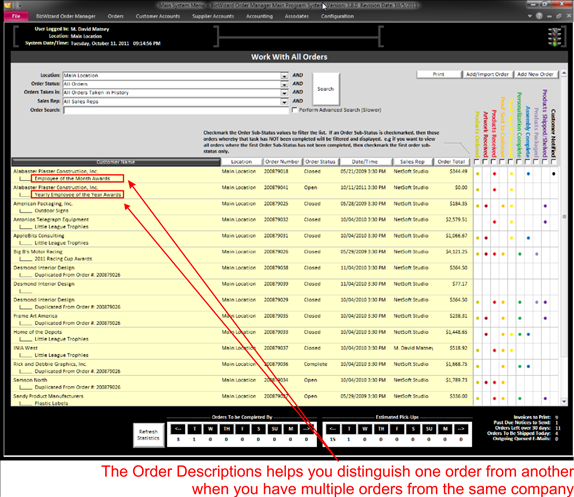
Enter a description of the order in this box (not required). The
information entered in the box will appear on the “work with” style screens
(see below). This can be extremely helpful distinguishing multiple orders from
the same customer by describing the order (i.e. league order for one order,
sponsor plaques for another order, team mom awards for yet another order)
|
|
|
|


